
Creating a temporary, customised, multi-user HPC cluster for teaching using Amazon AWS and Alces Flight
In a previous blog post, I told the story of how I used Amazon AWS and AlcesFlight to create a temporary multi-user HPC cluster for use in a training course. Here are the details of how I actually did it.
Note that I have only ever used this configuration as a training cluster. I am not suggesting that the customisations are suitable for real work.
Before you start
Before attempting to use AlcesFlight on AWS, I suggest that you ensure that you have the following things working
- A working AWS account. Ensure that you can create an EC2 virtual machine and connect to it via ssh.
- Get the AWS Command Line Interface working.
Customizing the HPC cluster on AWS
AlcesFlight provides a CloudFormation template for launching cluster instances on Amazon AWS. The practical upshot of this is that you answer a bunch of questions on a web form to customise your cluster and then you launch it.
We are going to use this CloudFormation template along with some bash scripts that provide additional customisation.
Get the customisation scripts
The first step is to get some customization scripts in an S3 bucket. You could use your own or you could use the ones I created.
If you use mine, make sure you take a good look at them first to make sure you are happy with what I’ve done! It’s probably worth using your own fork of my repo so you can customise your cluster further.
It’s the bash scripts that allow the creation of a bunch of user accounts for trainees with randomized passwords. My scripts do some other things too and I’ve listed everything in the github README.md.
git clone https://github.com/mikecroucher/alces_flight_customisation

cd alces_flight_customisation
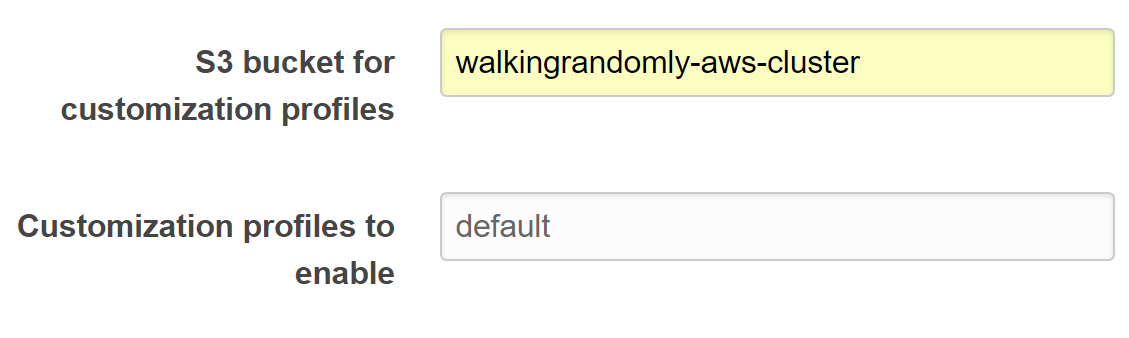
Now you need to upload these to an s3 bucket. I called mine walkingrandomly-aws-cluster
aws s3api create-bucket --bucket walkingrandomly-aws-cluster --region eu-west-2 --create-bucket-configuration LocationConstraint=eu-west-2

aws s3 sync . s3://walkingrandomly-aws-cluster --delete
Set up the CloudFormation template
- Head over to Alces Flight Solo (Community Edition) and click on continue to subscribe
- Choose the region you want to create the cluster in, select Personal HPC compute cluster and click on Launch with CloudFormationConsole

- Go through the CloudFormation template screens, creating the cluster as you want it until you get to the S3 bubcket for customization profiles box where you fill in the name of the S3 bucket you created earlier.
- Enable the default profile
- Continue answering the questions asked by the web form. For this simple training cluster, I just accepted all of the defaults and it worked fine
When the CloudFormation stack has been fully created, you can log into your new cluster as an administrator. To get the connection details of the headnode, go to the EC2 management console in your web-browser, select the headnode and click on Connect.
When you log in to the cluster as administrator, the usernames and passwords for your training cohort will be in directory specified by the password_file variable in the configure.d/run_me.sh script. I set my administrator account to be called walkingrandomly and so put the password file in /home/walkingrandomly/users.txt. I could then print this out and distribute the usernames and passwords to each training delegate.
This is probably not great sysadmin practice but worked on the day. If anyone can come up with a better way, Pull Requests are welcomed!

Try a training account
At this point, I suggest that you try logging in as one of the training user accounts and make sure you can successfully submit a job. When I first tried all of this, the default scheduler on the created cluster was SunGridEngine and my first attempt at customisation left me with user accounts that couldn’t submit jobs.
The current scripts have been battle tested with Sun Grid Engine, including MPI job submission and I’ve also done a very basic test with Slurm. However, you really should check that a user account can submit all of the types of job you expect to use in class.
Troubleshooting
When I first tried to do this, things didn’t go completely smoothly. Here are some things I learned to help diagnose the problems
Full documentation is available at http://docs.alces-flight.com/en/stable/customisation/customisation.html
On the cluster, we can see where its looking for its customisation scripts with the alces about command
alces about customizer

Customizer bucket prefix: s3://walkingrandomly-aws-cluster/customizer
The log file at /var/log/clusterware/instance.log on both the head node and worker nodes is very useful.
Once, I did all of this using a Windows CMD bash prompt and the customisation scripts failed to run. The logs showed this error
/bin/bash^M: bad interpreter: No such file or directory
This is a classic dos2unix error and could be avoided, for example, by using the Windows Subsystem for linux instead of CMD.exe.